


Using VPN to Connect Computers in Different Networks
In a world of dynamic IP assignments sometimes we must get creative. This is more of an exploration of possibilities than a preferred solution. In this walk through we are going to use Azure VPN Gateway to allow a remote computer to connect with a VPN to an Azure Virtual Network and allow communications initiated in either direction. If the remote computer was behind a NAT and with a private networks dynamically allocated IP address, we would at least know the IP address that was given to the VPN Client by the VPN Gateway. There would need to be a good way to discover it in the absence of a DNS server in the Azure Virtual network that could update a DNS host entry. This walkthrough is for a VPN Type of IKEv2.
With PowerShell, I created a self-signed root certificate:
$todaydt = Get-Date
$years = $todaydt.AddYears(20)

$cert = New-SelfSignedCertificate -Type Custom -KeySpec Signature `
-Subject "CN=MyVPNRootCert" -KeyExportPolicy Exportable `
-HashAlgorithm sha256 -KeyLength 2048  -notafter $years `
-CertStoreLocation "Cert:\CurrentUser\My" -KeyUsageProperty Sign -KeyUsage CertSign
Then I created a certificate signed with this root certificate:
New-SelfSignedCertificate -Type Custom -DnsName MyVPNCert -KeySpec Signature `
-Subject "CN=MyVPNCert" -KeyExportPolicy Exportable `
-HashAlgorithm sha256 -KeyLength 2048  -notafter $years `
-CertStoreLocation "Cert:\CurrentUser\My" `
-Signer $cert -TextExtension @("2.5.29.37={text}1.3.6.1.5.5.7.3.2")
From MMC Certificates snapin, export MyVPNRootCert without private key to a Base 64 .cer file. Copy the contents of that cert, the part in between the begin and end lines, and paste it in the Azure VPN Gateway > Point-to-Site configuration > Root Certificates, public certificate data textbox. I used a subnet from the 172.16.0.0 private subnet in the Address Pool textbox.
On the computer which you will configure a VPN client on, install the MyVPNCert. Weather you install this in the Computer cert store or the Personal cert store really depends on how your permissions for the account that runs the vpn is going to be. You can create the VPN client with the download from azure that shoes up after you configure the gateway, you can create the client in the newer Windows Settings tool or the older Control Panel network tool. There are a lot of details that you can find elsewhere on the variety of ways to get set up. But get one set up and working. Here is the gotcha:
I found that if you manage the TCPIP v4 properties of the connection (which is only visible with connections created in Control Panel) and check the use default network on remote gateway then AlwaysOn is not an option. And maybe you prefer having the split tunnel so that the traffic that is not destined for the remote network (the Azure Virtual Network) doesn't use that route. But if you do choose that option, you will find that when your VPN client is connected, computers in the Azure Virtual Network can reach it by the IP assigned to it by the Point-to-Site configuration. I want this but I also want AlwaysOn.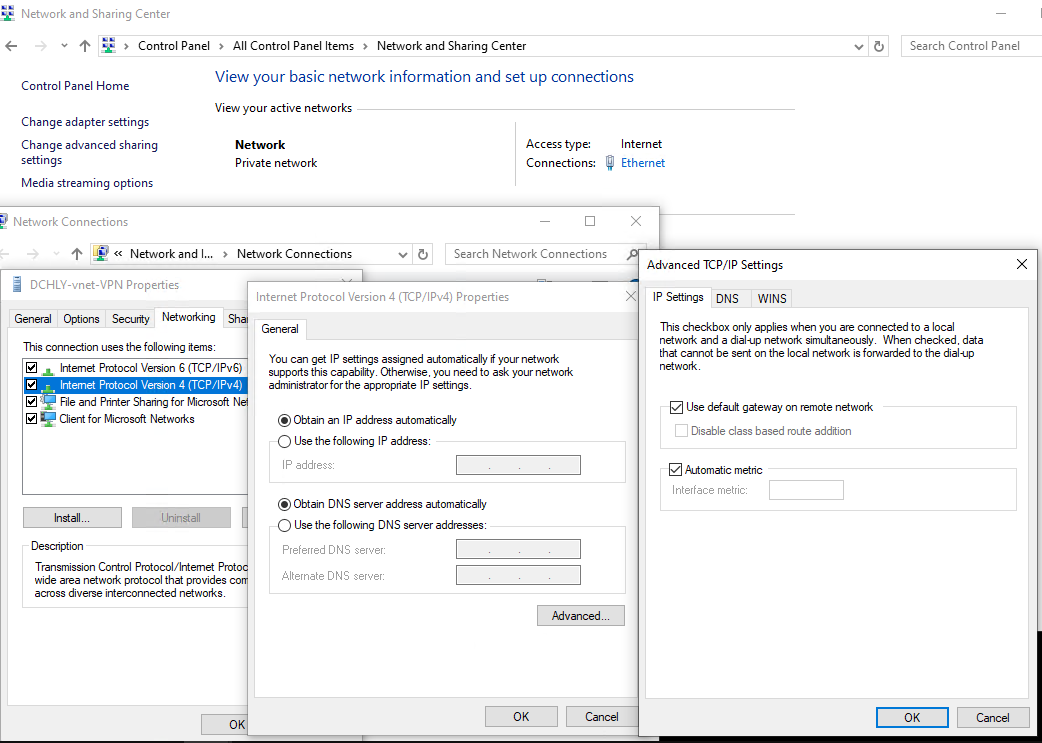
Microsoft has some PowerShell scripts https://learn.microsoft.com/en-us/windows-server/remote/remote-access/tutorial-aovpn-deploy-configure-client and I found a version of them on another guy's site https://directaccess.richardhicks.com/2018/07/23/always-on-vpn-routing-configuration/ but this is what I ended up with because I have no Active Directory and no internal DNS:
# This is a modified version of the one found here:
# https://learn.microsoft.com/en-us/windows-server/remote/remote-access/tutorial-aovpn-deploy-configure-client
# Define key VPN profile parameters
# Replace with your own values

$UserName = 'ComputerName\UserName'

$TemplateName = 'MY-vnet-VPN' # Name of existing VPN connection you confirmed works but is not AlwaysOn.

$ProfileName = 'MY-vnet-VPN-AlwaysOn' # Name of the profile you are going to create.

$Servers = 'azuregateway-xxx.vpn.azure.com' #Public or routable IP address or DNS name for the VPN gateway.

#Get the EAP settings for the current profile called $TemplateName -AllUserConnection (depends how you set up MY-vnet-VPN if you need this -AllUsersConnection flag)

$Connection = Get-VpnConnection -Name $TemplateName -AllUserConnection

if(!$Connection)
{
    $Message = "Unable to get $TemplateName connection profile: $_"
    Write-Host "$Message"
    exit
}

$EAPSettings= $Connection.EapConfigXmlStream.InnerXml

$ProfileNameEscaped = $ProfileName -replace ' ', '%20'

# Define ProfileXML
$ProfileXML = @("
<VPNProfile>
  <NativeProfile>
<Servers>$Servers</Servers>
<NativeProtocolType>IKEv2</NativeProtocolType>
<Authentication>
  <UserMethod>Eap</UserMethod>
  <Eap>
    <Configuration>
    $EAPSettings
    </Configuration>
  </Eap>
</Authentication>
<RoutingPolicyType>SplitTunnel</RoutingPolicyType>
<DisableClassBasedDefaultRoute>true</DisableClassBasedDefaultRoute>
</NativeProfile>
<AlwaysOn>true</AlwaysOn>
<RememberCredentials>true</RememberCredentials>
   <Route>
      <Address>10.0.0.0</Address>
      <PrefixSize>8</PrefixSize>
   </Route>
   <Route>
      <Address>172.16.0.0</Address>
      <PrefixSize>12</PrefixSize>
   </Route>
   <Route>
      <Address>192.168.0.0</Address>
      <PrefixSize>16</PrefixSize>
   </Route>
</VPNProfile>
")

#Output the XML for possible use in Intune
$ProfileXML | Out-File -FilePath ($env:USERPROFILE + '\desktop\VPN_Profile.xml')

# Escape special characters in the profile (<,>,")
$ProfileXML = $ProfileXML -replace '<', '<'
$ProfileXML = $ProfileXML -replace '>', '>'
$ProfileXML = $ProfileXML -replace '"', '"'

# Define WMI-to-CSP Bridge properties
$nodeCSPURI = "./Vendor/MSFT/VPNv2"
$namespaceName = "root\cimv2\mdm\dmmap"
$className = "MDM_VPNv2_01"

try
{
    $ObjUser = New-Object System.Security.Principal.NTAccount($UserName)
    $Sid = $ObjUser.Translate([System.Security.Principal.SecurityIdentifier])
    $SidValue = $Sid.Value
    $Message = "User SID is $SidValue."
    Write-Host "$Message"
}
catch [Exception]
{
    $Message = "Unable to get user SID. $_"
    Write-Host "$Message"
    exit
}

try
{
    # Define WMI session.
    $session = New-CimSession
    $options = New-Object Microsoft.Management.Infrastructure.Options.CimOperationOptions
    $options.SetCustomOption("PolicyPlatformContext_PrincipalContext_Type", "PolicyPlatform_UserContext", $false)
    $options.SetCustomOption("PolicyPlatformContext_PrincipalContext_Id", "$SidValue", $false)
}
catch {
    $Message = "Unable to create new session for $ProfileName profile: $_"
    Write-Host $Message
    exit
}

try
{
    # Create the VPN profile.
    $newInstance = New-Object Microsoft.Management.Infrastructure.CimInstance $className, $namespaceName
    $property = [Microsoft.Management.Infrastructure.CimProperty]::Create("ParentID", "$nodeCSPURI", "String", "Key")
    $newInstance.CimInstanceProperties.Add($property)
    $property = [Microsoft.Management.Infrastructure.CimProperty]::Create("InstanceID", "$ProfileNameEscaped", "String", "Key")
    $newInstance.CimInstanceProperties.Add($property)
    $property = [Microsoft.Management.Infrastructure.CimProperty]::Create("ProfileXML", "$ProfileXML", "String", "Property")
    $newInstance.CimInstanceProperties.Add($property)
    $session.CreateInstance($namespaceName, $newInstance, $options)
    $Message = "Created $ProfileName profile."
    Write-Host "$Message"
}
catch [Exception]
{
    $Message = "Unable to create $ProfileName profile: $_"
    Write-Host "$Message"
    exit
}

$Message = "Script Complete"
Write-Host "$Message"

Get-VpnConnection -Name $ProfileName
Get-VpnConnection -Name $ProfileName | Select-Object -ExpandProperty Routes
This creates and AlwaysOn VPN with additional routing so that the client's VPN address can be used to reach the client from the Azure Virtual Network. DisableClassBasedDefaultRoute combined with the Routes is the magic. The Azure virtual network is in the 10.0.0.0 private subnet. The VPN gateway is in the 172.16.0.0 private subnet. The remote computer lives in a 192.168.0.0 space.
However, I soon discovered AlwaysOn is only on when the VPN user is logged in! That is not what I wanted. Fortunately using Task Scheduler works.

Now, here is the rub. This is a very expensive solution. $5 a day at the least, the basic SKU, which would be a 10th cheaper, is no longer available. So, back to port forwarding and Dynamic DNS and feeling much less safe.